Well on this occasion I will share about the blogger guide. I will discuss the guidelines Unordered List or change the display which is usually called bullets. Unordered list format is usually used in the post if short sentences outlining the points raised or down is not sorted sequentially and usually preceded by the symbol • (dot). Using Unordered List format also shows that good quality articles, orderly, and neat. It will also attract the visitors on your blog and read one article that uses the format Unordered List in the post. Unordered List view which I will share with you this has attractive mini display icon, bottom border for each sentence, also has a background color.
How to set the Unordered List In the Post with Pictures :
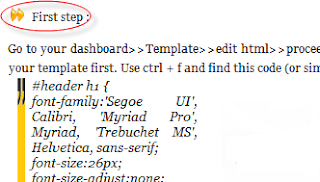
Go to your dashboard>>Template>>edit html>>proceed>>check expand template widget. Note : back up your template first. Use ctrl + f and find this code (or similar to this code), .post-body ul , modified with this code :
.post-body ul,
.post-body ol{
margin: 1em;
padding-left: 1em;
}
.post-footer ul{
margin: 1em;
margin-top: -0.5em;
padding-left: 1em;
}
.post-body ul li,
.post-footer ul li {list-style-image: url(https://blogger.googleusercontent.com/img/b/R29vZ2xl/AVvXsEh0z1LT-n__xtkjdF2Vgct37K3MeVppu2F1p9XWBI5Bc6ZJfBrOnjw-wY3jVqIMJKDirbdBUzobutK6qWbXN3v5kI17-Qu0oAbF6CMkJ6WQyPG8xpqv3w05Ly_rC703uSAzzjHe88m7R2g/s400/uncheck.gif);
border-bottom: 1px solid #ccc;
padding: .2em 0 .2em .5em;
}
.post-body ul li:hover,
.post-footer ul li:hover {cursor: pointer;
list-style-image:url(https://blogger.googleusercontent.com/img/b/R29vZ2xl/AVvXsEj0QIywsK7uLmgMP3Jnj9MI_GCkNpzfybZbxVMbYfhzb1pZfZEptcRSUH5t3_Blz9EnVEYdPDCQMW2tsgVQmtDw9L35PXBfB3zfdfc8K79f4hIsJZP0dGlNkYvb9ZrGHVDlFjhi1yNhaGA/s400/check.gif); background-color: #f2f2f2; color: #B1291F;
}
If your template not yet installed, please put the code under the code .post {................}
Save your template.