Showing posts with label Wordpress. Show all posts

Thursday, May 31, 2012

Getting More Views and Traffic

If you want your post to be indexed by search engines such as Google and Bing, you should set your blog privacy settings to make your blog visible to all search engines. The internet is full of theories as to how you can raise your post’s visibility in search rankings: none will contest that good quality original content with a few well-chosen tags is the best way to get started.

The Privacy Settings control who can and cannot view your blog. You can change your Privacy Settings via your Settings -> Privacy page:


Here, you will see three Site Visibility options:

  • Allow search engines to index this site. – This is the setting used by most blogs. It allows everyone to read your blog and enables your blog to be included in search engine results and other content sites.
  • Ask search engines not to index this site. – If you want all human visitors to be able to read your blog, but want to block web crawlers for search engines, this is the setting for you.
  • I would like my blog to be visible only to users I choose – Select this option to create a private blog. If you want others to be able to view your private blog (and add comments, if you’ve enabled them) you’ll need to invite them to be a viewer.
Tell people in your social networks about your new post

You can do this using WordPress.com’s Publicize feature, which will automatically tell your Twitter followers and Facebook friends as soon as you publish a new post.


If you don’t already have a Facebook account, sign up for one.

To connect your blog to your Facebook account, go to Settings > Sharing in your site Dashboard..
Save your setting, now your blog is connected with your facebook account. Add more service like : Twitter, Yahoo, Linkedin, etc for more traffic.

    Posted by: Denmas Tugino
    Godheg Updated at: Thursday, May 31, 2012

    Sunday, May 27, 2012

    How to Copy a Post in Wordpress Blog

    How to Copy a Post in Wordpress BlogIt takes much work to get a post just right. Why not reuse that effort? Copy A Post lets you duplicate a post, including the title, contents, tags and categories, so you can start a new post without having to re-enter tags, categories and formatting. Copy a Post appears within the Writing Helper module below the Editor on the Add a Post screen. To use Copy A Post, click on the button and it will open right in place.


    How to copy a post ?
    1. Go to your dashboard >> post >> copy a post;
    2. Select one of your post that want to copy.


    If you already have a post in progress and want to keep it, make sure to save the post before hitting Copy. After hitting copy  the post will look like this :
    Set the post title, categories, tags and other properties as you wish, and then publish the post.

    Posted by: Denmas Tugino
    Godheg Updated at: Sunday, May 27, 2012

    Saturday, May 12, 2012

    Uploading Image to Blog Post in Wordpress

    Images are a great way to enhance your WordPress.com blog, and adding and managing them is easy. You can upload the following image types to a post or page on your WordPress.com blog:.jpeg, .gif, .png. How to upload imaga to your post ?
    Upload Images from Your Computer


    1. Go to Posts -> Add New or Pages -> Add New, or open an existing post in editing mode.
    2. Place your cursor where you would like the image to appear, then click on the Add Media icon above your post/page editor:

    3.   Simply drag and drop your files into the box that appears, or click Select 
          Files to choose a photo from your computer to upload. Please keep in 
          mind that the drag and drop uploader only works in browsers with 
          HTML5 upload support such as the latest versions of Chrome, Firefox, 
          or Safari. Other browsers will still show the Select Files button or the 
          basic browser uploader form.
    Select image from your komputer and then press open

    4.  Once the uploading/crunching process has completed, you will be given the 
         option to edit some  settings before inserting the image into the post/page.

    You can also change some other settings and add additional information to your image.
    1. Title - Text displayed as a tooltip (when a mouse is hovered over the image).
    2. Alternate Text - The text displayed when the image is not available.
    3. Default Caption - Image caption displayed directly underneath the image.
    4. Description - Text displayed with the image in your dashboard and attachment pages on your blog.

    5. Link URL - The URL/web address to which the image will be linked.
        The None button will remove the link completely.
        The File URL button will link the image to its original, full-size version.
        The Attachment Post URL button will link the image to its attachment page.
    6. Alignment - The position of the image within your post or page. See this page 
        on image alignmentfor more information.
    7. Size - The size of the image.

    Click Insert into Post when you’re done adjusting the image’s settings.

    Posted by: Denmas Tugino
    Godheg Updated at: Saturday, May 12, 2012

    Friday, May 11, 2012

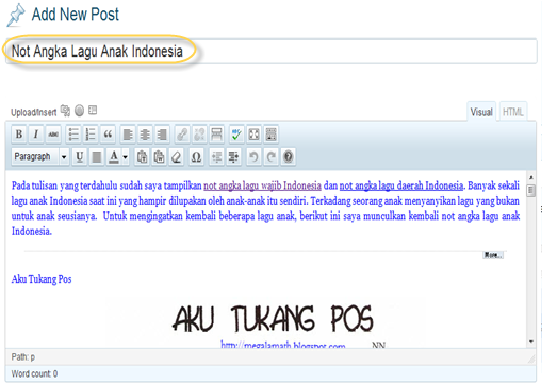
    How to Make a Post in Wordpress Blog ?

    Posts are the entries that display in reverse chronological order on your home page. In contrast to pages, posts usually have comments fields beneath them and are included in your site's RSS feed. You don't have to use HTML when writing your posts. WordPress will automatically add it to your site, but if you do want control over different elements like boxes, headings, and other additional containers or elements, use HTML.


    To write a post :
    A. Go to dashboard >> post >> Add new
    B. Start filling in the blanks
    As needed :
    1.  Post Title
    The title of your post. You can use any words or phrases. Avoid using the same title twice as that will cause problems. You can use commas, apostrophes, quotes, hypens/dashes, and other typical symbols in the post like "My Site - Here's Lookin' at You, Kid." WordPress will clean it up for the link to the post, called the post-slug.

    2.  Upload image
    Allows you to upload an image

    3.  Post Editing Area
    The blank box where you enter your writing, links, links to images, and any information you want to display on your site.

    4.  View post in visual or html view
    You can use either the Visual or the HTML view to compose your posts. 

    5.  Save Post Draft
    Allows you to save your post as a draft / pending review rather than immediately publishing it. To return to your drafts later, visit Posts - Edit in the menu bar, then select your post from the list.

    6.  Preview Post
    Allows you to view the post before officially publishing it.

    7.  Publish Box
    Contains buttons that control the state of your post. The main states are Published, Pending Review, and Draft. A Published status means the post has been published on your blog for all to see. Pending Review means the draft is waiting for review by an editor prior to publication. Draft means the post has not been published and remains a draft for you. If you select a specific publish status and click the update post or Publish button, that status is applied to the post. For example, to save a post in the Pending Review status, select Pending Review from the Publish Status drop-down box, and click Save As Pending. (You will see all posts organized by status by going to Posts > Edit). To schedule a post for publication on a future time or date, click "Edit" in the Publish area next to the words "Publish immediately". You can also change the publish date to a date in the past to back-date posts. Change the settings to the desired time and date. You must also hit the "Publish" button when you have completed the post to publish at the desired time and date.

    8.  Select a category
    Allows you to select a category of your post. The general topic the post can be classified in.

    Posted by: Denmas Tugino
    Godheg Updated at: Friday, May 11, 2012

    How to Arrange Widgets in Wordpress Sidebar

    How to Arrange Widgets in Wordpress Sidebar. If you haven’t added any widgets to your sidebars, the theme will show a default set of widgets, which will not be listed in the Sidebar area. Once you activate any widget, the default set is cancelled and you have to select and add the widgets of your choice. 
    Go to dashboard>> appearance >> widgets 
    Drag widgets from avaliable widget area to a sidebar on the right to activate  and customize them. Drag widgets back to avaliable widget area to deactivate them and delete their settings. Look at the picture bellow :
    1 - 2.  Drag the widgets into the order you want(sidebar frame), customize  widget.
    3.  Then click "save changes".
    4.  Close the widget, see whats your blog appereance.

    Posted by: Denmas Tugino
    Godheg Updated at: Friday, May 11, 2012

    Thursday, May 10, 2012

    How to Manage Theme in Wordpress Blog

    Sundance is a free video theme for WordPress by automattic. Despite its minimalist design, Sundance was crafted with clean, elegant typography and close attention to detail. The home page offers a featured video carousel. Sundance supports the video post format, widgets, custom background, custom header, custom menus, and a custom link feature for your social media pages
    Follow this tutorial to manage your theme.
    Manage theme option :
    1.  Select theme option.
         Check RSS Link to show RSS Link in your sidebar
    2.  Fil the form with your twitter, facebook, google plus, and flicker link.
    3.  Save Changes.

    Manage Custom Header :
    1.  Click header.
    2.  Choose image file from your computer or image library and then 
         click upload and  then check show header text with your image. 
         You can upload a custom header image to be shown at the top of 
         your site instead of the default one. On the next screen you will be 
         able to crop the image. Images of exactly 984 × 242 pixels will be 
         used as-is.
    3.  Set the background header colour with a custom colour,
    4.  Save Changes.

    Manage Custom Background :
    1. Click the Background button
    2. Choose image or custom color ( same as manage custom header )
    3. Save Changes. Check how your blog appearance :

    Posted by: Denmas Tugino
    Godheg Updated at: Thursday, May 10, 2012

    Create a Blog Site with WordPress

    WordPress is a free personal publishing platform. It is an easy to use, fast and flexible blog script. It comes with a great set of features, designed to make your experience as a publisher as pleasant as possible. With WordPress you can easily make a blog. How to create blog site with Wordpress ? Follow this tutorials step by step


    Go to Wordpress.com, click Sign Up and fill the form :
    Edit Profile and then save the profile
    Go to your e-mail and activate blog
    Choose one of Wordpress themes, the example I choose Sundance Theme by clicking Choose This Theme.
    Select my blog and then go to your blog

    Done, your blog have been made !

    The next step is managing your theme, the next tutorial is how to managing Wordpress theme.

    Posted by: Denmas Tugino
    Godheg Updated at: Thursday, May 10, 2012